
How to apply your DIY Lash Extensions
How to Apply Lashes at Home — The Easy, Mess-Free Way
Applying lashes at home has never been easier thanks to our beginner-friendly DIY lash kits and professional-grade tools. Whether you like a classic lash or a volumes lash you can achieve salon-style results without leaving your bathroom.
Start by prepping your natural lashes, apply our lightweight bond adhesive, place the lash segments along your lash line, and finish with a sealing coat to lock in your look for all-day wear. No glue mess, no salon appointment, just stunning lashes in minutes.

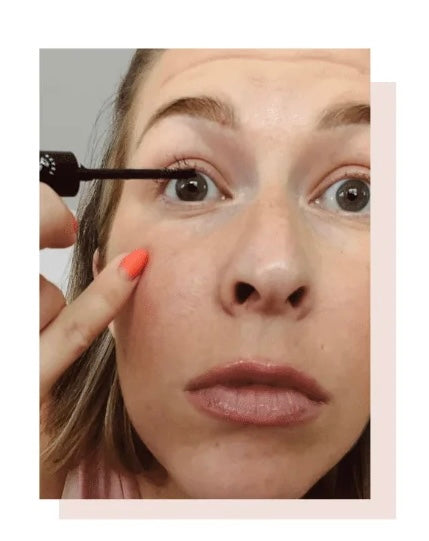
Step 1 - Bond

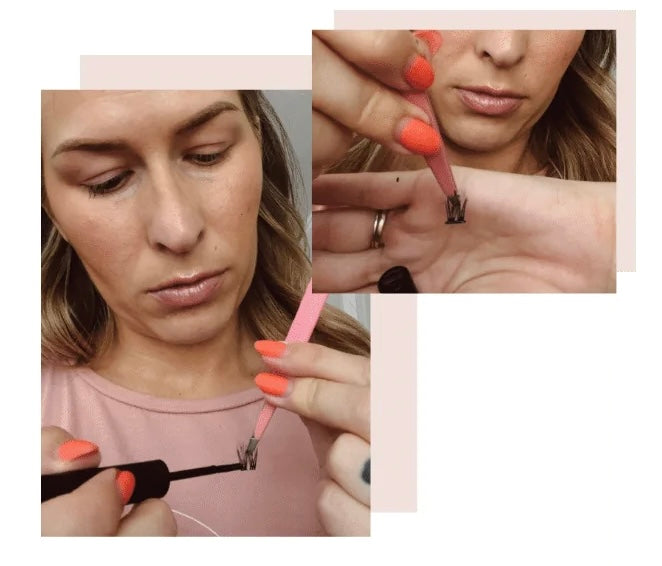
Step 2 - Prep the Lash

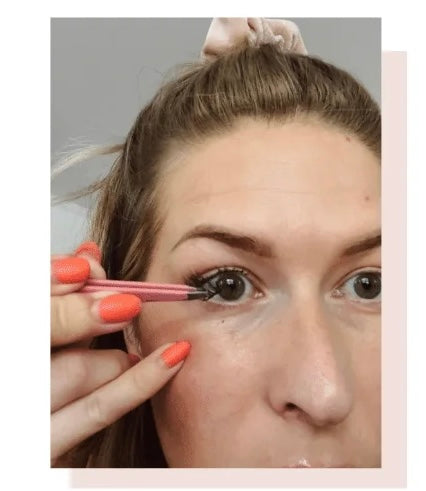
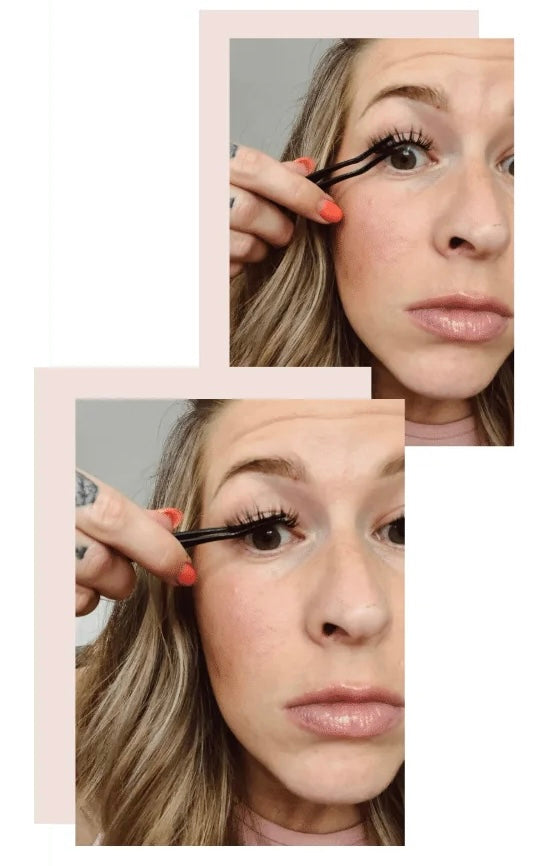
Step 3 - Apply the Lash

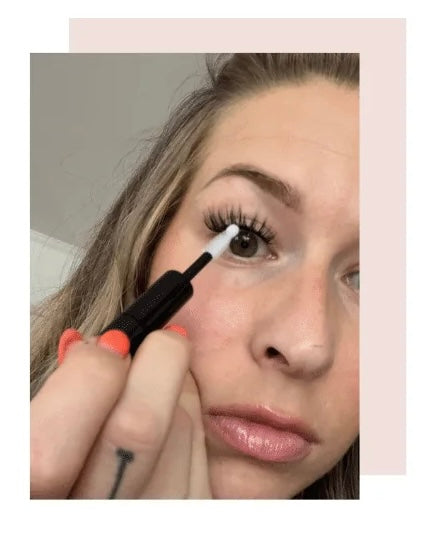
Step 4 - Seal it

Step 6 - Fuse
Seal & Squeeze your Lashes
Dab sealant along the base of your lashes and a small amount in between your fuse tweezer.
Gently squeeze your lashes.
Pull the tweezers out from the side, trying to avoid touching the tips of your lashes.
Safely remove DIY Lashes
Safely remove your lashes by applying a liberal amount of remover both underneath and above the lashes.
Fully work in using your fingers or the wand until they start to slide off.
Do not pick or Pull them off.
FAQ
-
How are these different then extensions?
These are different in a few ways. Lash segments are applied at home for the most part though it can be offered as a service as well. They are larger segments, that are applied underneath the lash line where as extensions are applied to each individual lash by a lash technician. The bond used is a flexible glue that more similar to strip glue where extension adhesive hardens for a stronger hold. Extensions last 2-3 weeks where these last 7-10 days.
-
What’s the difference between cluster lashes and strip lashes?
Cluster lashes are small segments of lashes applied individually to create a custom look. They’re more lightweight and flexible, ideal for DIY application and are applied underneath the lash line.
Strip lashes come pre-set on a single lash band and require trimming and glue along the entire strip and are applied above the lash line. Cluster lashes offer more natural blending and control over your final lash style.
-
What is lash bond and how do I use it?
Lash bond is a lightweight adhesive designed for DIY lash application. It acts like a glue but is formulated to be gentler on natural lashes while still providing a secure hold. Apply a small amount at the base of your natural lashes before placing your cluster lash segments.
-
How do I clean lash applicator tools?
To keep your lash applicator tools hygienic and precise, clean them after each use. Use a gentle oil-free makeup remover or 70% isopropyl alcohol on a cotton pad to wipe away any residual lash bond, sealant, or adhesive. Dry thoroughly before storing. Regular cleaning ensures better DIY lash application and prevents product buildup.
-
Are DIY lashes safe for sensitive eyes?
Revel Lash is committed to providing high-quality products, including options that are suitable for many with sensitive eyes. However, everyone’s skin and eye sensitivity is different. We recommend doing a patch test with the bond adhesive and sealant before full application. If you experience any redness, irritation, or discomfort, discontinue use and consult with a healthcare provider.
This is not medical advice. Please use your discretion when using any lash adhesive near the eye area. -
Are cluster lashes damaging to natural lashes?
When applied and removed properly, DIY cluster lashes are generally safe and non-damaging. Avoid pulling, tugging, or using harsh products, and always remove them with a proper lash remover to protect your natural lashes and lash line.
However, it's important to note that over time, some individuals may develop sensitivities or allergies to lash adhesives. Additionally, lash loss can occur from bacteria buildup caused by improper cleaning. To help protect both your eyes and your natural lashes, make sure to gently wash your lash line daily with a lash-safe, oil-free cleanser.
-
Are your lash products reusable?
At Revel Lash, we do not recommend reusing DIY lash segments. While some may attempt to reuse them, it’s difficult to ensure that the lashes are properly sanitized after wear. Bacteria and residue can build up on used lash clusters, especially when applied near the eye area. For your safety and eye health, we always advise using fresh, clean lash segments with each application.
As always, please follow best hygiene practices and avoid reuse to reduce the risk of irritation or infection.*For cost-conscious lash lovers, we offer convenient lash bundles so you can stock up and save.Our multi-pack options make it easy to enjoy a fresh set every time—without breaking the bank.
-
Can I apply cluster lashes without tweezers?
Yes, you can apply cluster lashes without tweezers, but using a lash applicator tool or angled tweezers is highly recommended for precision and ease. If you prefer to go tool-free, make sure your hands are clean and dry, and gently pinch the DIY lash segments at the base to apply them along your lash line. Keep in mind that tweezers or applicators offer better control and help reduce glue mess—especially for beginners learning how to apply lash clusters at home.
-
Can I sleep with DIY lash extensions on?
Yes, many of our customers wear their DIY cluster lashes overnight, especially when using our bond and seal system. For best results, avoid sleeping face-down and consider using a silk pillowcase to help your lashes stay in place. Keep in mind, lash longevity can vary depending on your sleeping habits and skin type.
-
Can I swim in my DIY Cluster Lashes?
Yes you can go in the water and swimming with your DIY lash extensions on, however as chlorine, saltwater, and direct water pressure can weaken the bond, and bodies of water can contain bacteria. If you do get your lashes wet, always wash them thoroughly after, gently pat them dry and avoid rubbing to extend their wear time.
-
Can I shower with DIY lashes on?
You can shower with your at-home lash extensions on, but we recommend avoiding direct water pressure on the eyes and skipping oil-based products that may loosen the bond. Let your lashes gently air dry and avoid rubbing or pulling. For longer wear, keep your lashes dry for the first 24 hours after application.
-
What should I avoid after applying DIY lash extensions?
Avoid using oil-based products near your eyes, don’t rub your lashes, and try to stay out of steamy environments for the first 24 hours. These precautions help preserve the adhesive and extend the life of your at-home lash extensions.
-
Why isn’t my lash bond holding properly?
Common issues include applying too much product, skipping the sealant, or applying bond to wet or oily lashes. For best results, start with clean, dry natural lashes and use a thin layer of bond only where needed.
-
How do I prep my natural lashes before applying DIY lashes?
Start with clean, dry lashes. Remove all oils and makeup residue using a gentle, oil-free cleanser or micellar water. Avoid using moisturizers around the lash line. Well-prepped natural lashes allow better grip and longevity when applying cluster lash segments with bond and seal adhesive.
-
Why DIY Lashes over extensions?
In all reality these are not the same as extensions but they are a great alternative. For people who are allergic to lash extensions, people who have a hard time with the commitment or maintenance of lash extensions or simply don’t have the upkeep in their budget or need a break these are an excellent option. They are also great for special events for someone who only needs them temporarily but wants them for more then just an evening.
-
If I'm allergic to lash extensions can I wear these?
yes! The adhesive is a different chemical compound then what is used for extensions so it’s a great alternative if you’re allergic to lash extensions. It’s always good to do a patch test on yourself if you have any concerns.
-
Why are my cluster lashes lifting at the corners?
Corner lifting is often caused by applying too much or too little bond, or from oils breaking down the adhesive. Be sure to apply a thin, even layer of bond only where needed, and press each lash segment securely into place. Using a sealant and avoiding oil-based skincare products near the eyes can also help prevent lifting.
-
What should I avoid after applying DIY lash extensions?
Avoid using oil-based products near your eyes, don’t rub your lashes, and try to stay out of steamy environments for the first 24 hours. These precautions help preserve the adhesive and extend the life of your at-home lash extensions.
-
Can I wear makeup with my DIY lashes?
We don’t recommend wearing makeup over your DIY lash extensions, as it can compromise the adhesive and create a breeding ground for bacteria if not properly removed. However, if you must, choose oil-free, lash-safe makeup and avoid applying mascara directly onto the lash clusters. Always remove makeup carefully with a gentle, oil-free cleanser that won’t break down the bond, and clean the area thoroughly to help prevent buildup and bacteria near the lash line.
-
Is the glue latex free?
Yes! Both latex and formaldehyde free.
-
How do I remove DIY lashes safely?
Use a gentle lash remover like our oil-free formula to dissolve the bond without pulling or damaging your natural lashes. Let it sit for a few seconds, then gently slide the lashes off.
-
How long do DIY lashes last?
With proper application and sealing, your DIY cluster lashes can last up to 5 days, depending on your routine and lash care.
With proper application and care, DIY cluster lashes can last anywhere from 3 to 5 days. Using a strong bond and seal lash system, avoiding oil-based products, and sleeping on your back can help extend wear. For even longer results, touch-ups can be made by reapplying individual segments as needed.
-
Can these damage my natural lashes?
No! Just like extensions it’s important to have proper care and be gentle with them but they won’t damage your naturals. The glue is very flexible which allows room for your naturals to continue grow and move as needed.
Using the remover to take off the lashes and any additional glue will help maintain your natural lash health as well.